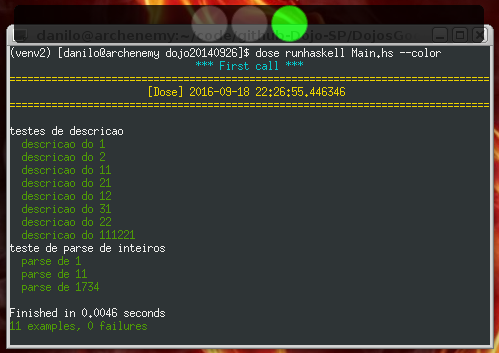
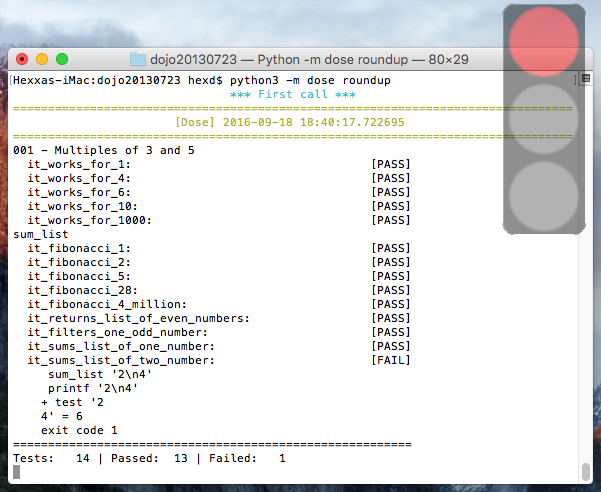
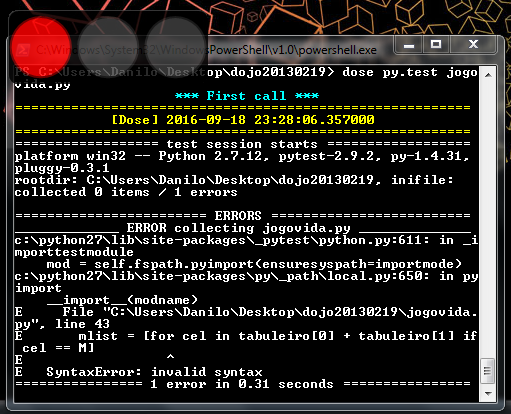
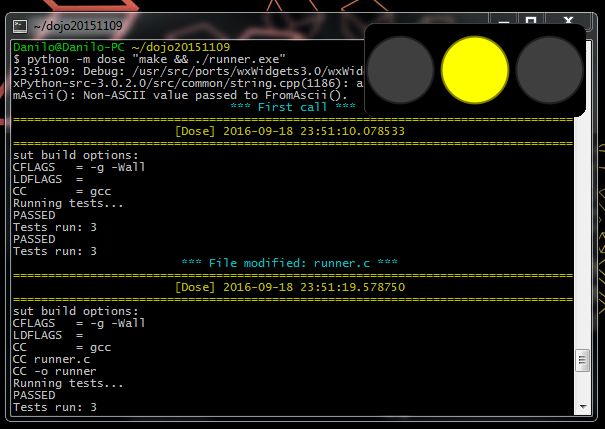
Automated traffic light/signal/semaphore GUI showing the state during test driven development (TDD), mainly written for coding dojos.
Project description

|
|

|
|

|
|

|
|
What does it do?
Runs a test command when some file is created/modified/deleted, showing the returned value in a GUI.
There are 3 states:
Red: Last test job failed/errored (it didn’t return zero)
Yellow: Running a test job
Green: Last test job passed (it returned zero)
The test job output is written on the standard output, so it should appear in the console/terminal whereby Dose was called. The same applies to the standard error, whose text should appear in red.
Syntax / Example
Just call dose TEST_COMMAND, where TEST_COMMAND is what you would call to run your test suite in a terminal/console/shell. Dose is written in Python but the test command can be any shell command.
Hint (color): Any ANSI escaping code from the test command (e.g. colors) is also sent to the standard streams in the underlying console (Linux, Mac OS X and Cygwin) or converted by colorama to Windows Console Handles API calls (Windows). In other words, colors are enabled. For example, in a tox + py.test Python project whose tox.ini has commands = py.test {posargs}, you can force the py.test coloring with dose tox -- --color=yes.
Hint (shell): You can use shell pipes in your test command by quoting the whole command, e.g. dose "cat tests.txt | verify.sh".
What does it watch?
Using the watchdog package, Dose recursively watches a working directory for file creation/modification/deletion events.
The watched directory is the current working directory whence Dose was called. You can change it from the GUI. The test command is called in the same directory.
There’s a customizable ignore pattern to avoid undesired detections on temporary/compiled files.
Valid events during a test would kill (SIGTERM) a test job to restart it. There’s a 10ms delay before starting/spawning a test job subprocess, which is kept alive for at least 50ms before being able to be killed. Multiple events are handled as a single event to avoid spawning/killing more than required.
There’s a cycle/repeat detection in the watcher: repeating an event won’t kill the test job. Modifying the same file twice will have the second modification ignored, unless it happens after finishing a test job.
Hint (change directory): You can watch a directory and call a command in another directory by using cd PATH && TEST_COMMAND as your test command, e.g. dose "cd toxinidir && tox".
GUI Controls
On Linux / Windows
Dragging: Move
Dragging holding Ctrl: Resize
Dragging holding Shift: Controls the transparency
Double click: start or stop the watcher (can kill the test job)
A right click shows more options.
On Mac OS X
Dragging: Move
Dragging holding ⌘: Resize
Dragging holding ⇧: Controls the transparency
Double click: start or stop the watcher (can kill the test job)
A right click (or Ctrl + mouse click) shows more options.
Installation
Dose has few requirements:
Linux, OS X, Windows or Cygwin (Windows)
Python (2 or 3) with pip/wheel/setuptools
PyPI packages (auto-installed):
watchdog
docutils
colorama
wxPython 2.8, 3.0 (either Classic or Phoenix) or 4+ (Phoenix)
All the packages are installed with pip, including wxPython, but this last one you might need/want to install by using a build packaged in your operating system repository, so the following documentation, once created for older versions of wxPython (before its 4.0 release), was kept here as part of the documentation.
On Python 3, wxPython Phoenix is required (since wxPython Classic requires Python 2, modus tollens). Even on Python 2, Phoenix is usually easier to install, as it can be installed directly via pip no matter the platform or Python version:
pip install wxPython
The wxPyWiki have a detailed page on how to install wxPython, whence that Phoenix install command came. The link includes some detailed information on how to install wxPython Classic.
If that’s not enough, below are some detailed information on how to install Dose and its requirements on each platform/environment/system it supports.
Installing Dose with pip/wheel/setuptools
You should install with pip, which gets the Dose wheel from PyPI (recommended):
pip install dose
To install from the source distribution (e.g. after cloning this repository), you can either use pip (recommended):
pip install .
Wheel:
python setup.py bdist_wheel
wheel install dist/*.whl
Or setuptools directly (not recommended):
python setup.py install
To uninstall Dose with pip while keeping its requirements installed:
pip uninstall dose
Other useful and self-explanatory commands are:
pip install --upgrade dose
pip install --force-reinstall dose
Dose should be kept upgraded. To check which Dose version is installed, you can use pip list or pip freeze. Without pip, you can check the version from the dose.__version__ variable:
python -c "import dose ; print(dose.__version__)"
Python virtualenv
If you wish to install Dose in a Python virtualenv instead of a system installation, you should either:
Install wxPython Phoenix via pip (recommended);
Create a virtualenv with the --system-site-packages option in a system that already has some wxPython version installed.
On Linux / Mac OS X / Cygwin, this creates a venv27 directory with a new virtualenv that can access the system site-packages library directory, i.e., the installed packages:
virtualenv --system-site-packages -p python2.7 venv27
On Windows, you should just replace python2.7 by your python.exe file. You should remove the --system-site-packages for a virtualenv with independent libraries.
To activate it (Linux / Mac OS X / Cygwin):
source venv27/bin/activate
To activate it (Windows):
venv27/Scripts/activate.bat
Afterwards, you should install Dose with pip/wheel/setuptools in the activated virtual environment.
If virtualenv isn’t available in your Python distribution, it can be installed with:
pip install virtualenv
Requirements on Arch Linux
For a simple installation, it’s available in AUR.
This distro doesn’t include a /usr/bin/pip script, so you should use python2 -m pip (Python 2) or python -m pip (Python 3) instead of just pip. By the way, in this Linux distribution python means Python 3, only python2 means Python 2, unless you’re in a virtualenv. The commands below should be called with sudo.
When installing pip, you don’t need to worry if the Python interpreter itself is installed in your system, as the package manager would install python for you as a dependency if it’s not installed. To install pip and wxPython Phoenix 4 on Python 3:
pacman -Sy python-pip python-wxpython
The wxPython Phoenix snapshot can be installed via pip. On the other hand, to install pip and wxPython Classic 3.0 on Python 2:
pacman -Sy python2-pip python2-wxpython3
If you wish to install Dose in a virtualenv, you should install the python-virtualenv (Python 3) or the python2-virtualenv (Python 2) package with pacman, following the virtualenv instructions afterwards.
Requirements on Ubuntu/Debian/MINT Linux
You should use pip3 instead of pip on Python 3, unless you’re in a virtualenv. The commands below should be called with sudo. You can also install the described packages (names after “install“) with an APT GUI like synaptic. These distros usually come with Python, nevertheless Python itself is installed as a dependency when installing pip. Before calling the install commands, remember to:
apt-get update
Installing pip on Python 3:
apt-get install python3-pip
The wxPython Phoenix snapshot can be installed via pip. To install pip and wxPython Classic 2.8 on Python 2:
apt-get install python-pip python-wxgtk2.8
If you wish to install Dose in a virtualenv, you should install the python-virtualenv (Python 2) or the python3-virtualenv (Python 3) package from APT, following the virtualenv instructions afterwards. If these aren’t available, you should install the virtualenv package from PyPI with pip.
Requirements on Mac OS X
Everything discussed here happens in a console, you can open one with Spotlight by pressing Command (⌘) + Space and typing Terminal. The recommended (and easier) way to install the requirements is via Homebrew, even in Mac OS X 10.11 (El Capitan). Another option would be installing Python directly from the Python official site packages, but that installation procedure isn’t described here.
Python from Mac OS X 10.11 (El Capitan)
This is an installation procedure without Homebrew, using the Python interpreter that comes with Mac OS X 10.11 (El Capitan). It comes with Python 2.7, but not with pip. You can install pip using the command:
curl https://bootstrap.pypa.io/get-pip.py | sudo python
If you wish to install wxPython Phoenix via pip without receiving an OSError: [Errno 1] Operation not permitted: ..., you have to temporarily disable the System Integrity Protection, but that’s something you probably don’t want to do. The same happens with Dose, but to avoid that issue you can install Dose directly from its setup.py instead of using pip/wheel.
On the other hand, if you wish to install wxPython Classic 3.0, you should get the “Cocoa” Mac OS X binary packages directly from the wxPython official site. But that’s not enough, as the package structure isn’t supported by this OS X version. Following the instructions from the DaviXX’ Blog post about wxPython on OS X, you should:
In Finder, open (double click) the downloaded dmg file;
Click with the right mouse button (or Ctrl + click) on the wxPython3.0-osx-cocoa-py2.7.pkg file, and click on Show Package Contents;
Drag the Contents directory to your Desktop and, on the same Finder window, eject the “wxPython”-prefixed device;
Open Contents, then open Resources, there you should rename:
preflight to preinstall
postflight to postinstall
Open (double click) wxPython3.0-osx-cocoa-py2.7.pax.gz, there should appear an usr directory;
Create two directories in that very same Resources directory, with the names:
pkg_root
scripts
Move (drag):
usr to pkg_root
preinstall to scripts
postinstall to scripts
In a Terminal, type these 2 commands (be careful, you should use the ~ symbol, not the ˜ symbol):
cd ~/Desktop/Contents/Resources
pkgbuild --root ./pkg_root --scripts ./scripts \
         --identifier com.wxwidgets.wxpython \
         ~/Desktop/wxPython3.0-osx-cocoa-py2.7-repackaged.pkg
Wait until the Terminal gives you the Wrote package message. You can now delete the Contents directory and the downloaded dmg, just open (double click) the wxPython3.0-osx-cocoa-py2.7-repackaged.pkg file in your desktop and wxPython Classic 3.0 is installed. The aforementioned blog post does the same procedure, but in a command line approach.
Homebrew
A single command in a Terminal is enough to install Homebrew
/usr/bin/ruby -e "$(curl -fsSL \
  https://raw.githubusercontent.com/Homebrew/install/master/install)"
In a terminal, before calling the install commands, remember to:
brew update
To install Python 3 (already comes with pip, henceforth called pip3 for this Python version):
brew install python3
There you can install wxPython Phoenix via pip (replacing pip by pip3 in the install command).
To install Python 2 (already comes with pip) and wxPython Classic 3.0:
brew install python wxpython
Requirements on Windows
On Windows, you can install Python from some distribution or directly from the Python official site binary packages, the procedure described here uses the latter approach.
The installation asks for adding Python to the path, you should add it to use python, pip (and dose afterwards) on any path. It’s recommended that you keep the installation directory simple (e.g. the paths where tox looks for Python interpreters: C:\Python27 for Python 2.7 and C:\Python35 for Python 3.5), as the python.exe isn’t renamed nor copied to version-specific filenames and that becomes an issue if you wish to keep more than one Python version installed. The suggested path is the default for Python 2.7, but for Python 3.5 you have to choose Customize installation to change the path.
The Python binary packages for Windows already comes with pip as 3 executable files in the Scripts subdirectory on the path where Python was installed: pip.exe, pipA.exe and pipA.B.exe, where A.B is the Python version (e.g. 2.7 or 3.5).
A terminal is required for installing Dose and its requirements, as well as for using Dose afterwards. You can use either the Windows PowerShell (powershell.exe) or the Command Prompt (cmd.exe), they can be called by pressing Windows + R and typing the executable filename (without the .exe suffix/extension).
If you wish to install wxPython Phoenix, it can be easily installed via pip using the formerly described command, you just have to care about the path: you can see if pip is in the path by trying to call it or by seeing in the PowerShell if $env:path includes the Python scripts directory (e.g. C:\Python27\Scripts). If not, you should go to that directory before calling pip, e.g.:
cd \Python27\Scripts
pip install dose
On Python 2.7, you can install wxPython Classic from the package in the wxPython official site. If you’ve installed Python in the recommended path, the installer should detect the installation path. If you installed Python on C:\Python27 (the Python installation path and also the directory where the python.exe lies), then you should install wxPython on C:\Python27\Lib\site-packages. If Python was installed otherwhere, the \Lib\site-packages suffix should be added accordingly. When asked, use the full installation (i.e., everything checked).
Requirements on Cygwin (Windows)
If you just wish to run Dose on Windows, you should read the previous section instead. Cygwin is another platform, one that runs on Windows and has many resources from Linux. On Cygwin, even the Python resources are the ones documented as available in POSIX systems.
To install Python 2 and wxPython Classic 3.0 on Cygwin, you have to install these packages from the Cygwin installer (as well as their dependencies detected by the installer):
Net/curl
Python/python
Libs/python-wx3.0
X11/xinit
X11/xorg-server
Open the Start Menu -> Cygwin-X -> XWin Server, it will just flash and disappear, but its X and C icons should appear in the taskbar. Click on the C icon -> System -> Cygwin Terminal to open a terminal that can display a X GUI in Windows.
To install pip, you should use this command in the Cygwin Terminal:
curl https://bootstrap.pypa.io/get-pip.py | python
To activate wxPython Classic 3.0 (i.e., to make it the default wxPython installation):
cd /lib/python2.7/site-packages
echo wx-3.0* > wx.pth
Please see the CHANGES.rst file for more information.
Copyright (C) 2012-2021 Danilo de Jesus da Silva Bellini
Project details
Download files
Download the file for your platform. If you're not sure which to choose, learn more about installing packages.
Source Distribution
Built Distribution
File details
Details for the file dose-1.2.2.tar.gz.
File metadata
- Download URL: dose-1.2.2.tar.gz
- Upload date:
- Size: 367.3 kB
- Tags: Source
- Uploaded using Trusted Publishing? No
- Uploaded via: twine/3.4.2 importlib_metadata/4.8.1 pkginfo/1.7.1 requests/2.26.0 requests-toolbelt/0.9.1 tqdm/4.62.3 CPython/3.10.1
File hashes
| Algorithm | Hash digest | |
|---|---|---|
| SHA256 | 5d3d30937ad632345a313c739607930b77868ca668a2218b9256396feb8fef0a |
|
| MD5 | 506ae19ef81d8935b1494e0dc737601f |
|
| BLAKE2b-256 | 92e0c674f49cfa096f346e88cc6b433ee84ee8ee614277842b51447db15e0984 |
File details
Details for the file dose-1.2.2-py2.py3-none-any.whl.
File metadata
- Download URL: dose-1.2.2-py2.py3-none-any.whl
- Upload date:
- Size: 376.3 kB
- Tags: Python 2, Python 3
- Uploaded using Trusted Publishing? No
- Uploaded via: twine/3.4.2 importlib_metadata/4.8.1 pkginfo/1.7.1 requests/2.26.0 requests-toolbelt/0.9.1 tqdm/4.62.3 CPython/3.10.1
File hashes
| Algorithm | Hash digest | |
|---|---|---|
| SHA256 | a349cdbcdea370ecda999d2339c31a5c189a3a2823abea2e996c380cff914232 |
|
| MD5 | 276536f69374f5ad0c433353584280be |
|
| BLAKE2b-256 | f0d6564e8a24e7001ce6930c06a10c0a5f14240a22debd4809aa0b8d460b3829 |


