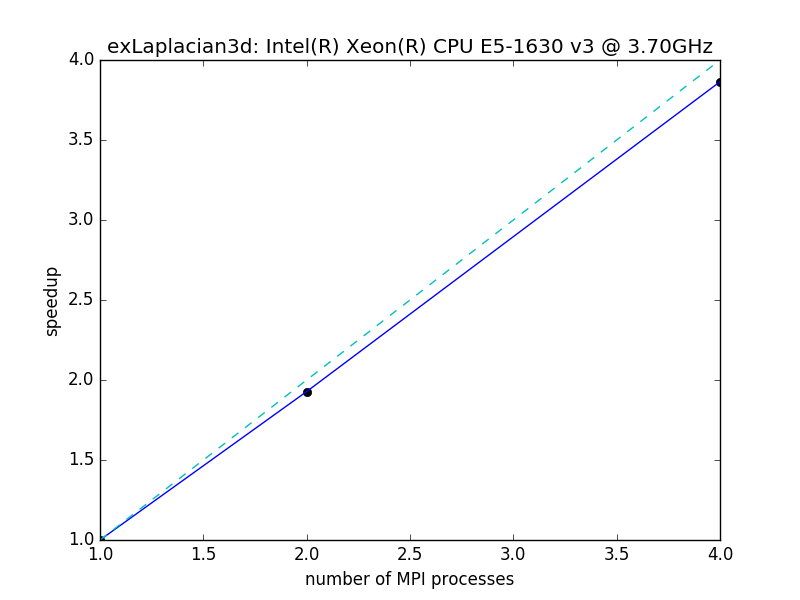
A very lightweight implementation of distributed arrays
Project description
mumpy
Parallel computing in N dimensions made easy in Python
Overview
mumpy is a very lightweight implementation of distributed arrays, which runs on architectures ranging from multi-core laptops to large MPI clusters. mumpy is based on numpy and mpi4py and supports arrays in any number of dimensions. Processes can access remote data using a "getData" method. This can be used to access neighbor ghost data but is more flexible as it allows to access data from any process--not necessarily a neighboring one. mumpy is designed to work seamlessly with numpy's slicing operators ufunc, etc., making it easy to transition your code to a parallel computing environment.

How to get mumpy
git clone https://github.com/pletzer/mumpy.git
How to build mumpy
mumpy requires:
- python 3.5 or later
- numpy
- MPI library (e.g. MPICH2)
- mpi4py, e.g. 3.x
python setup.py install
or, if you need root access,
sudo python setup.py install
Alternatively you can use
pip install mumpy
or
pip install mumpy --user
How to test mumpy
Run any file under tests/, e.g.
cd tests
mpiexec -n 4 python testDistArray.py
How to use mumpy
To run script myScript.py in parallel use
mpiexec -n numProcs python <myScript.py>
where numProcs is the number of processes.
A lightweight extension to numpy arrays
Think of mumpy arrays as standard numpy arrays with additional data members and methods to access neighboring data.
To create a ghosted distributed array (gda) use:
from mumpy import gdaZeros
da = gdaZeros((4, 5), numpy.float32, numGhosts=1)
The above creates a 4 x 5 float32 array filled with zeros -- the syntax should be familiar to anyone using numpy arrays.
All numpy operations apply to mumpy distributed arrays with no change and this includes slicing. Note that slicing operations are with respect to local array indices.
In the above, numGhosts describes the thickness of the halo region, i.e. the slice of data inside the array that can be accessed by other processes. A value of numGhosts = 1 means the halo has depth of one. The thicker the halo the more costly communication will be because more data will need to be copied from one process to another.
For a 2D array, the halo can be broken into four regions:
- da[:numGhosts, :] => west
- da[-numGhosts:, :] => east
- da[:, :numGhosts] => south
- da[:, -numGhosts:] => north
(In n-dimensions there are 2n regions.) mumpy identifies each halo region with a tuple:
- (-1, 0) => west
- (1, 0) => east
- (0, -1) => south
- (0, 1) => north
To access data on the south region of remote process otherRk, use
southData = da.getData(otherRk, winID=(0, -1))
Using a regular domain decomposition
The above will work for any domain decomposition, not necessarily a regular one. In the case where a global array is split into uniform chunks of data, otherRk can be inferred from the local rank and an offset vector:
from mumpy import CubeDecomp
decomp = CubeDecomp(numProcs, dims)
...
otherRk = decomp.getNeighborProc(self, da.getMPIRank(), offset=(0, 1), periodic=(True, False))
where numProcs is the number of processes, dims are the global array dimensions and periodic is a tuple of True/False values indicating whether the domain is periodic or not. In the case where there is no neighbour rank (because the local da.getMPIRank() rank lies at the boundary of the domain), then getNeighborProc may return None. In this case getData will also return None.
A very high level
For the Laplacian stencil, one may consider using
from mumpy import Laplacian
lapl = Laplacian(decomp, periodic=(True, False))
Applying the Laplacian stencil to any numpy-like array inp then simply involves:
out = lapl.apply(inp)
Project details
Release history Release notifications | RSS feed
Download files
Download the file for your platform. If you're not sure which to choose, learn more about installing packages.
Source Distribution
Built Distribution
File details
Details for the file mpinum-1.4.3.tar.gz.
File metadata
- Download URL: mpinum-1.4.3.tar.gz
- Upload date:
- Size: 22.1 kB
- Tags: Source
- Uploaded using Trusted Publishing? No
- Uploaded via: twine/4.0.2 CPython/3.11.6
File hashes
| Algorithm | Hash digest | |
|---|---|---|
| SHA256 | ab6208a92c7c33a117931e395f5cf6d1f54a4167c20774a88f742b84d3124420 |
|
| MD5 | d37309021cf4a59b402008be6b8d6d3c |
|
| BLAKE2b-256 | ce139b07027974f4cbe474dec2962b1fd58665a1825dc73997784e661481f536 |
File details
Details for the file mpinum-1.4.3-py3-none-any.whl.
File metadata
- Download URL: mpinum-1.4.3-py3-none-any.whl
- Upload date:
- Size: 17.7 kB
- Tags: Python 3
- Uploaded using Trusted Publishing? No
- Uploaded via: twine/4.0.2 CPython/3.11.6
File hashes
| Algorithm | Hash digest | |
|---|---|---|
| SHA256 | f5dc093a6fa23f4f1b5018bdbd3bfa5de7d1391aac2418f7d1aea1829a20c1a4 |
|
| MD5 | 6703c87476488c8292f03eb8f68bab33 |
|
| BLAKE2b-256 | 62c9477100aeb49a1f9d617affd5e5ae57bd0af4abc19e02ed9816f1b9eaffde |


