Notifications module of OpenWISP
Project description


openwisp-notifications provides email and web notifications for OpenWISP.
Its main goal is to allow the other OpenWISP modules to notify users about meaningful events that happen in their network.
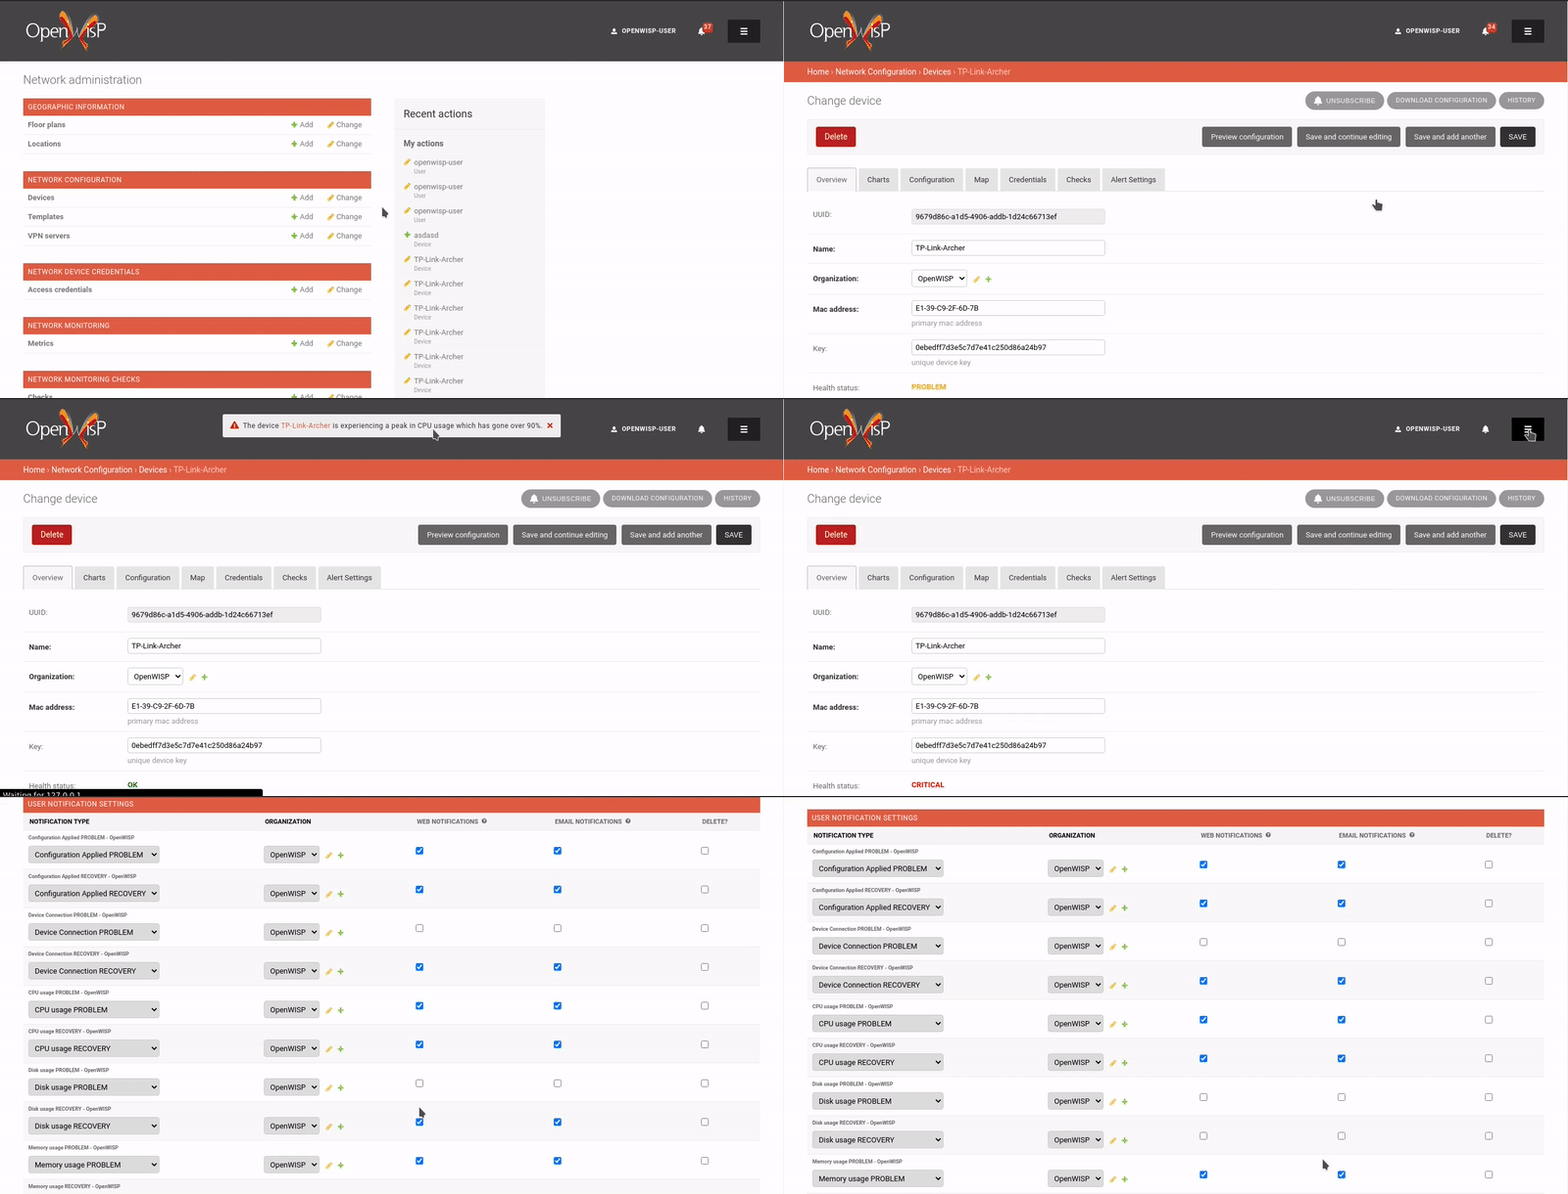
For a more complete overview of the OpenWISP modules and architecture, see the OpenWISP Architecture Overview.
Available features
Install stable version from pypi
Install from pypi:
pip install openwisp-notificationsInstall development version
Install tarball:
pip install https://github.com/openwisp/openwisp-notifications/tarball/masterAlternatively, you can install via pip using git:
pip install -e git+git://github.com/openwisp/openwisp-notifications#egg=openwisp_notificationsSetup (integrate into an existing Django project)
INSTALLED_APPS in settings.py should look like the following:
INSTALLED_APPS = [
    'django.contrib.auth',
    'django.contrib.contenttypes',
    'django.contrib.sessions',
    'django.contrib.messages',
    'django.contrib.staticfiles',
    'django.contrib.sites',
    'django_extensions',
    'allauth',
    'allauth.account',
    'allauth.socialaccount',
    # rest framework
    'rest_framework',
    'rest_framework.authtoken',
    'drf_yasg',
    'django_filters',
    'openwisp_users',
    # notifications module
    'openwisp_notifications',
    # add openwisp theme
    # (must be loaded here)
    'openwisp_utils.admin_theme',
    'django.contrib.admin',
    # channels
    'channels',
]Note: openwisp_utils.admin_theme and django.contrib.admin should always follow openwisp_notifications in INSTALLED_APPS as shown in the example above. It might result in undesired behavior otherwise, e.g. notification bell not being shown on admin site.
Add notification_api_settings context processor:
TEMPLATES = [
    {
        # ...
        'OPTIONS': {
            # ...
            'context_processors': [
                # ...
                'openwisp_notifications.context_processors.notification_api_settings',
                # ...
            ],
        },
    },
]urls.py:
from django.contrib import admin
from django.urls import include, path
from django.contrib.staticfiles.urls import staticfiles_urlpatterns

urlpatterns = [
    path('admin/', admin.site.urls),
    path('api/v1/', include(('openwisp_users.api.urls', 'users'), namespace='users')),
    path('', include('openwisp_notifications.urls', namespace='notifications')),
]

urlpatterns += staticfiles_urlpatterns()
Add routes for websockets:
# In yourproject/asgi.py
from channels.auth import AuthMiddlewareStack
from channels.routing import ProtocolTypeRouter, URLRouter
from django.core.asgi import get_asgi_application
from openwisp_notifications.websockets.routing import get_routes

application = ProtocolTypeRouter(
    {'websocket': AuthMiddlewareStack(URLRouter(get_routes()))}
)
Configure caching (you may use a different cache storage if you want):
CACHES = {
    'default': {
        'BACKEND': 'django_redis.cache.RedisCache',
        'LOCATION': 'redis://localhost/0',
        'OPTIONS': {
            'CLIENT_CLASS': 'django_redis.client.DefaultClient',
        }
    }
}

SESSION_ENGINE = 'django.contrib.sessions.backends.cache'
SESSION_CACHE_ALIAS = 'default'
Configure celery:
# Here we are showing how to configure celery with Redis but you can
# use other brokers if you want, consult the celery docs
CELERY_BROKER_URL = 'redis://localhost/1'
Configure celery beat:
CELERY_BEAT_SCHEDULE = {
    'delete_old_notifications': {
        'task': 'openwisp_notifications.tasks.delete_old_notifications',
        'schedule': timedelta(days=1),
        'args': (90,),
    },
}Note: You will only need to add CELERY_BEAT_SCHEDULE setting if you want automatic deletion of old notifications. Please read Scheduled deletion of notifications section to learn more about this feature.
If you decide to use redis (as shown in these examples), make sure the python dependencies are installed in your system:
pip install redis django-redisConfigure ASGI_APPLICATION:
ASGI_APPLICATION = 'yourproject.asgi.application'Configure channel layers (you may use a different channel layer):
CHANNEL_LAYERS = {
    'default': {
        'BACKEND': 'channels_redis.core.RedisChannelLayer',
        'CONFIG': {
            'hosts': ['redis://localhost/7'],
        },
    },
}
While development, you can configure it to localhost as shown below:
INTERNAL_IPS = ['127.0.0.1']Run migrations
./manage.py migrateNote: Running migrations is also required for creating notification settings apart from creating database schema.
Sending notifications
Notifications can be created using the notify signal. Eg:
from django.contrib.auth import get_user_model
from swapper import load_model

from openwisp_notifications.signals import notify

User = get_user_model()
Group = load_model('openwisp_users', 'Group')
admin = User.objects.get(email='admin@admin.com')
operators = Group.objects.get(name='Operator')

notify.send(
    sender=admin,
    recipient=operators,
    description="Test Notification",
    verb="Test Notification",
    email_subject='Test Email Subject',
    url='https://localhost:8000/admin',
)
The above code snippet creates and sends a notification to all users belonging to the Operators group if they have opted-in to receive notifications. Non-superusers receive notifications only for organizations which they are a member of.
Note: If recipient is not provided, it defaults to all superusers. If the target is provided, users of same organization of the target object are added to the list of recipients given that they have staff status and opted-in to receive notifications.
The complete syntax for notify is:
notify.send(
    actor,
    recipient,
    verb,
    action_object,
    target,
    level,
    description,
    **kwargs
)Note: Since openwisp-notifications uses django-notifications under the hood, usage of the notify signal has been kept unaffected to maintain consistency with django-notifications. You can learn more about accepted parameters from django-notifications documentation.
Additional notify keyword arguments
Parameter |
Description |
email_subject |
Sets subject of email notification to be sent. Defaults to the notification message. |
url |
Adds a URL in the email text, eg: For more information see <url>. Defaults to None, meaning the above message would not be added to the email text. |
type |
Set values of other parameters based on registered notification types Defaults to None meaning you need to provide other arguments. |
Web Notifications
Openwisp Notifications send a web notification to the recipients through django’s admin site. Following are the components which allows browsing web notifications:
Notification Widget
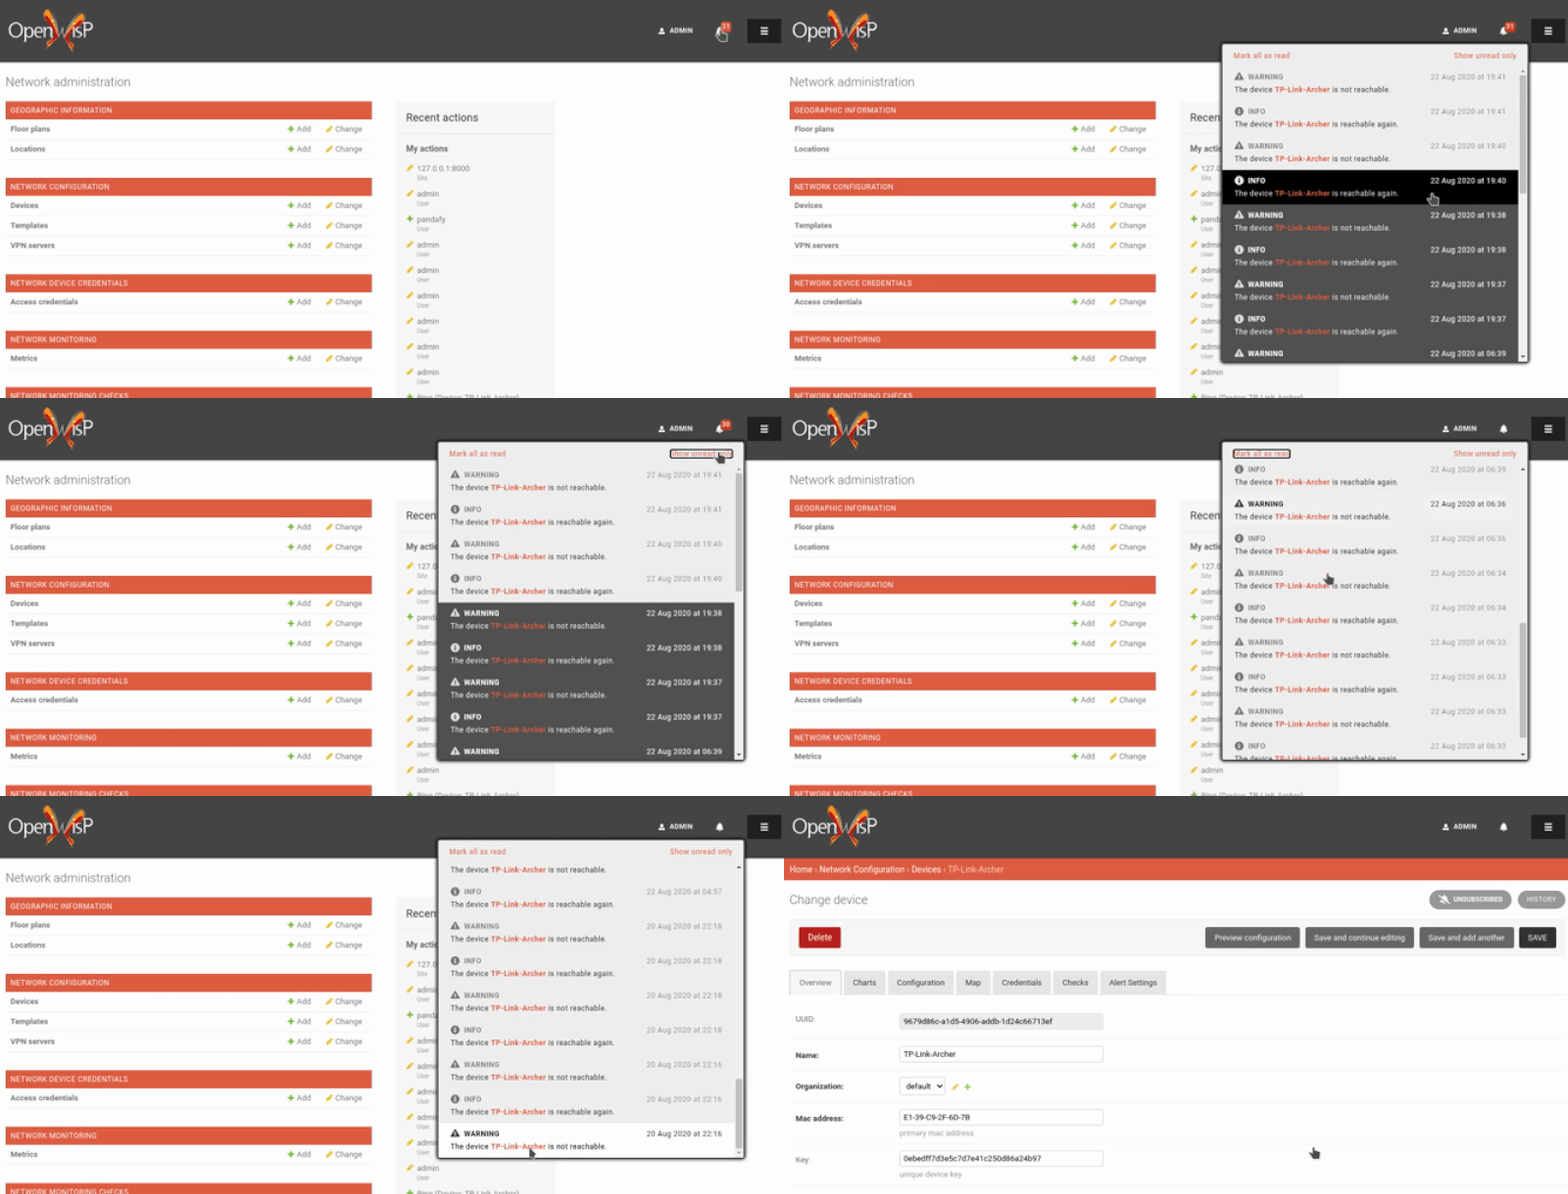
A javascript widget has been added to make consuming notifications easy for users. The notification widget provides following features:
A minimalistic UI to help getting things done quickly.
Dynamically loading notifications with infinite scrolling to prevent unnecessary network requests.
Option to filter unread notifications.
Option to mark all notifications as read on a single click.
Notification Toasts
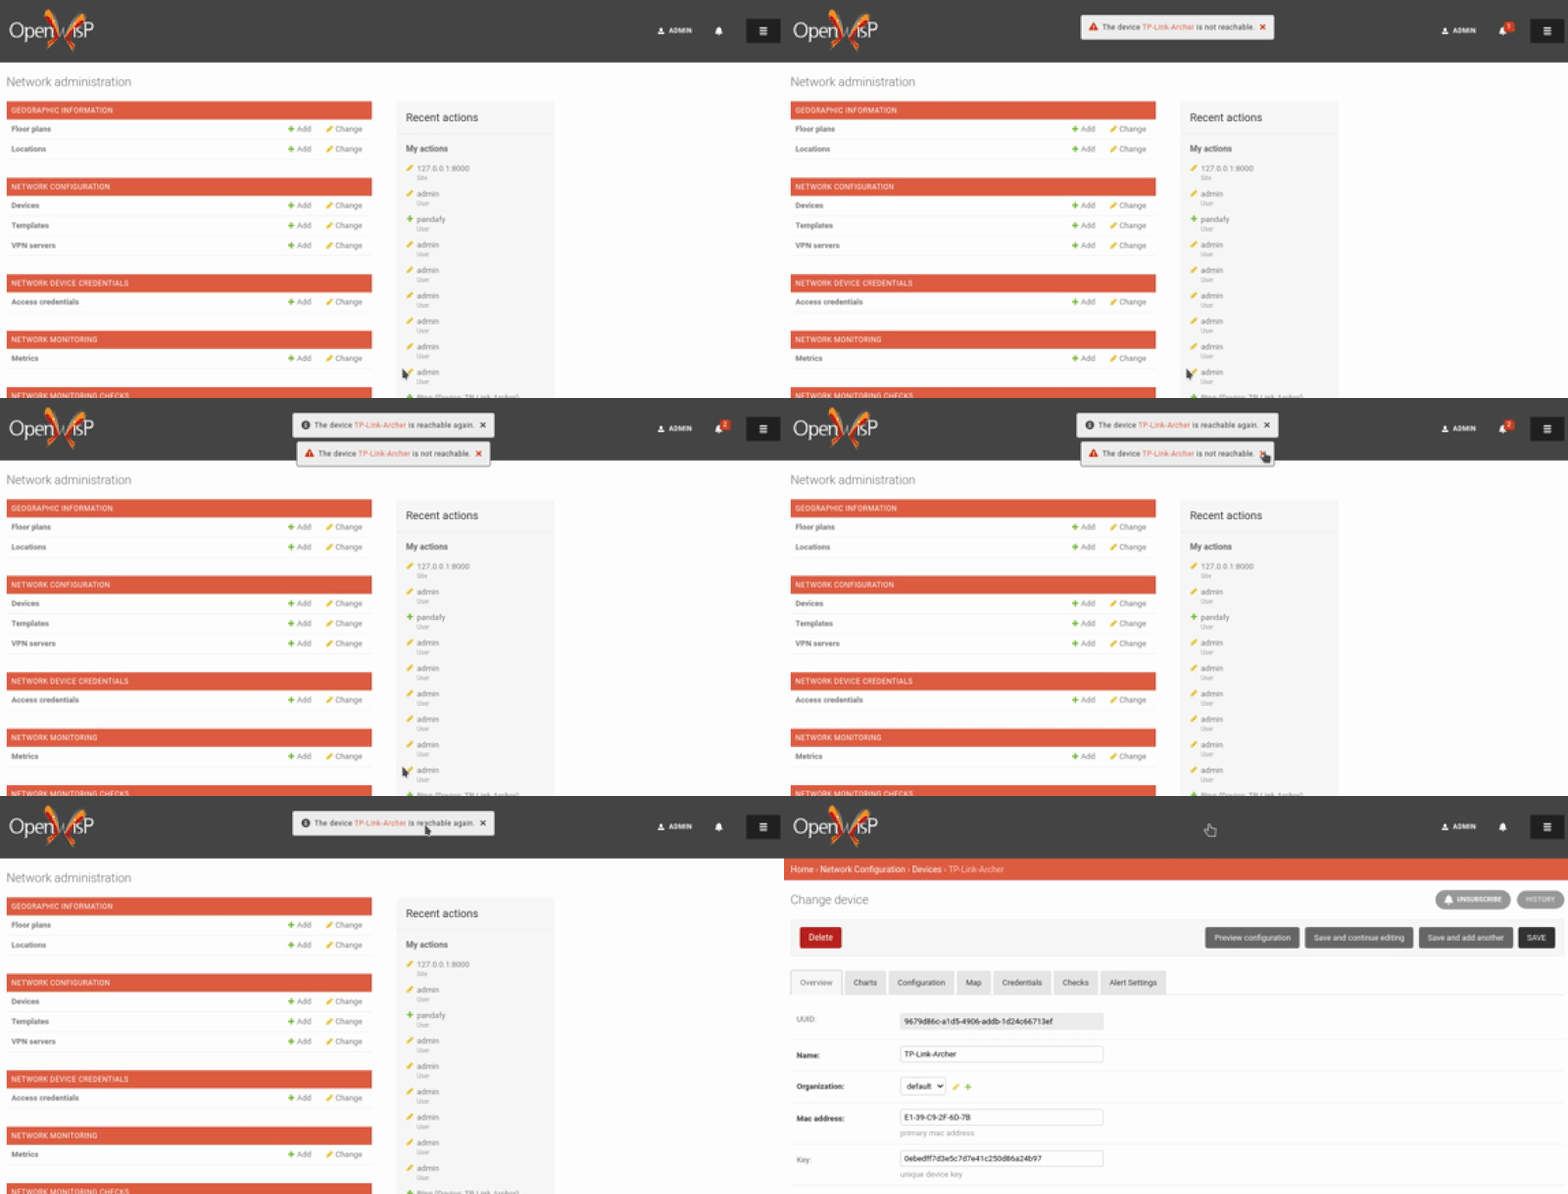
A notification toast delivers notifications at real-time. This allows users to read notifications without even opening the notification widget. A notification bell is also played to alert each time a notification is displayed through notification toast.
Email Notifications
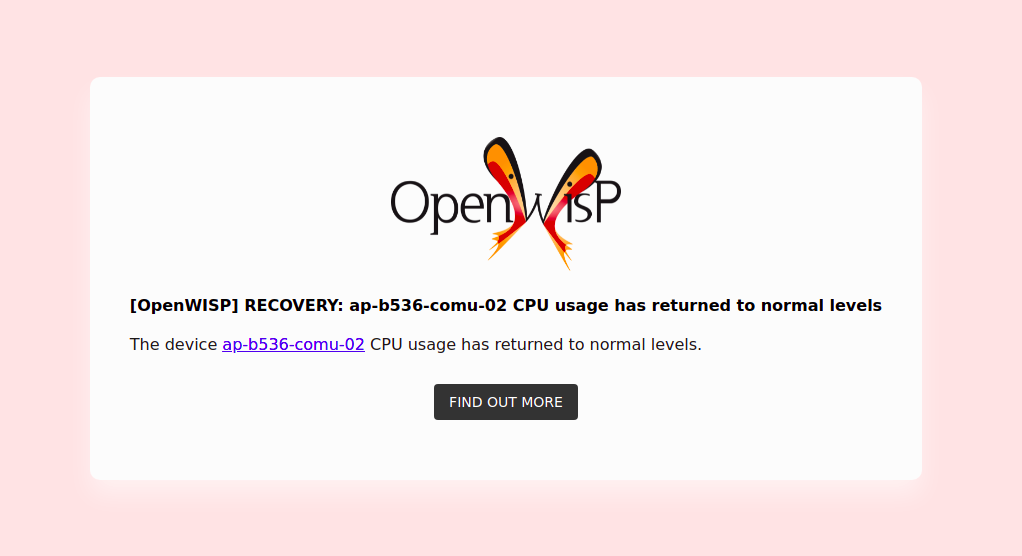
Along with web notifications OpenWISP Notification also sends notifications through emails.
Following notification email is generated by OpenWISP Notification in OpenWISP Monitoring:
Notification Cache
In a typical OpenWISP installation, actor, action_object and target objects are same for a number of notifications. To optimize database queries, these objects are cached using Django’s cache framework. The cached values are updated automatically to reflect actual data from database. You can control the duration of caching these objects using OPENWISP_NOTIFICATIONS_CACHE_TIMEOUT setting.
Cache invalidation
The function register_notification_cache_update can be used to register a signal of a model which is being used as an actor, action_object and target objects. As these values are cached for the optimization purpose so their cached values are need to be changed when they are changed. You can register any signal you want which will delete the cached value. To register a signal you need to include following code in your apps.py.
from django.db.models.signals import post_save
from swapper import load_model

def ready(self):
    super().ready()

    # Include lines after this inside
    # ready function of you app config class
    from openwisp_notifications.handlers import register_notification_cache_update

    model = load_model('app_name', 'model_name')
register_notification_cache_update(model, post_save, dispatch_uid="myapp_mymodel_notification_cache_invalidation")Note: You need to import register_notification_cache_update inside the ready function or you can define another funtion to register signals which will be called in ready and then it will be imported in this function. Also dispatch_uid is unique identifier of a signal. You can pass any value you want but it needs to be unique. For more details read preventing duplicate signals section of Django documentation
Notification Types
OpenWISP Notifications simplifies configuring individual notification by using notification types. You can think of a notification type as a template for notifications.
These properties can be configured for each notification type:
Property |
Description |
level |
Sets level attribute of the notification. |
verb |
Sets verb attribute of the notification. |
verbose_name |
Sets display name of notification type. |
message |
Sets message attribute of the notification. |
email_subject |
Sets subject of the email notification. |
message_template |
Path to file having template for message of the notification. |
email_notification |
Sets preference for email notifications. Defaults to True. |
web_notification |
Sets preference for web notifications. Defaults to True. |
Note: A notification type configuration should contain atleast one of message or message_template settings. If both of them are present, message is given preference over message_template.
Defining message_template
You can either extend default message template or write your own markdown formatted message template from scratch. An example to extend default message template is shown below.
# In templates/your_notifications/your_message_template.md
{% extends 'openwisp_notifications/default_message.md' %}
{% block body %}
    [{{ notification.target }}]({{ notification.target_link }}) has malfunctioned.
{% endblock body %}Note: You can access all attributes of the notification using notification variables in your message template as shown above. Additional attributes actor_link, action_link and target_link are also available for providing hyperlinks to respective object.
Note: After writing code for registering or unregistering notification types, it is recommended to run database migrations to create notification settlings for these notification types.
Registering / Unregistering Notification Types
OpenWISP Notifications provides registering and unregistering notifications through utility functions openwisp_notifications.types.register_notification_type and openwisp_notifications.types.unregister_notification_type. Using these functions you can register or unregister notification types from your code.
register_notification_type
This function is used to register a new notification type from your code.
Syntax:
register_notification_type(type_name, type_config, models)Parameter |
Description |
type_name |
A str defining name of the notification type. |
type_config |
A dict defining configuration of the notification type. |
models |
An optional list of models that can be associated with the notification type. |
An example usage has been shown below.
from openwisp_notifications.types import register_notification_type
from django.contrib.auth import get_user_model

User = get_user_model()

# Define configuration of your notification type
custom_type = {
    'level': 'info',
    'verb': 'added',
    'verbose_name': 'device added',
    'message': '[{notification.target}]({notification.target_link}) was {notification.verb} at {notification.timestamp}',
    'email_subject' : '[{site.name}] A device has been added',
    'web_notification': True,
    'email_notification': True,
}

# Register your custom notification type
register_notification_type('custom_type', custom_type, models=[User])Note: It will raise ImproperlyConfigured exception if a notification type is already registered with same name(not to be confused with verbose_name).
Note: You can use site and notification variables while defining message and email_subject configuration of notification type. They refer to objects of django.contrib.sites.models.Site and openwisp_notifications.models.Notification respectively. This allows you to use any of their attributes in your configuration. Similarly to message_template, message property can also be formatted using markdown.
unregister_notification_type
This function is used to unregister a notification type from anywhere in your code.
Syntax:
unregister_notification_type(type_name)Parameter |
Description |
type_name |
A str defining name of the notification type. |
An example usage is shown below.
from openwisp_notifications.types import unregister_notification_type

# Unregister previously registered notification type
unregister_notification_type('custom type')Note: It will raise ImproperlyConfigured exception if the concerned notification type is not registered.
Passing extra data to notifications
If needed, additional data, not known beforehand, can be included in the notification message.
A perfect example for this case is an error notification, the error message will vary depending on what has happened, so we cannot know until the notification is generated.
Here’s how to do it:
from openwisp_notifications.types import register_notification_type

register_notification_type('error_type', {
    'verbose_name': 'Error',
    'level': 'error',
    'verb': 'error',
    'message': 'Error: {error}',
    'email_subject': 'Error subject: {error}',
})
Then in the application code:
from openwisp_notifications.signals import notify

try:
    operation_which_can_fail()
except Exception as error:
    notify.send(
        type='error_type',
        sender=sender,
        error=str(error)
)Note: It is recommended that all notification types are registered or unregistered in ready method of your Django application’s AppConfig.
Notification Preferences
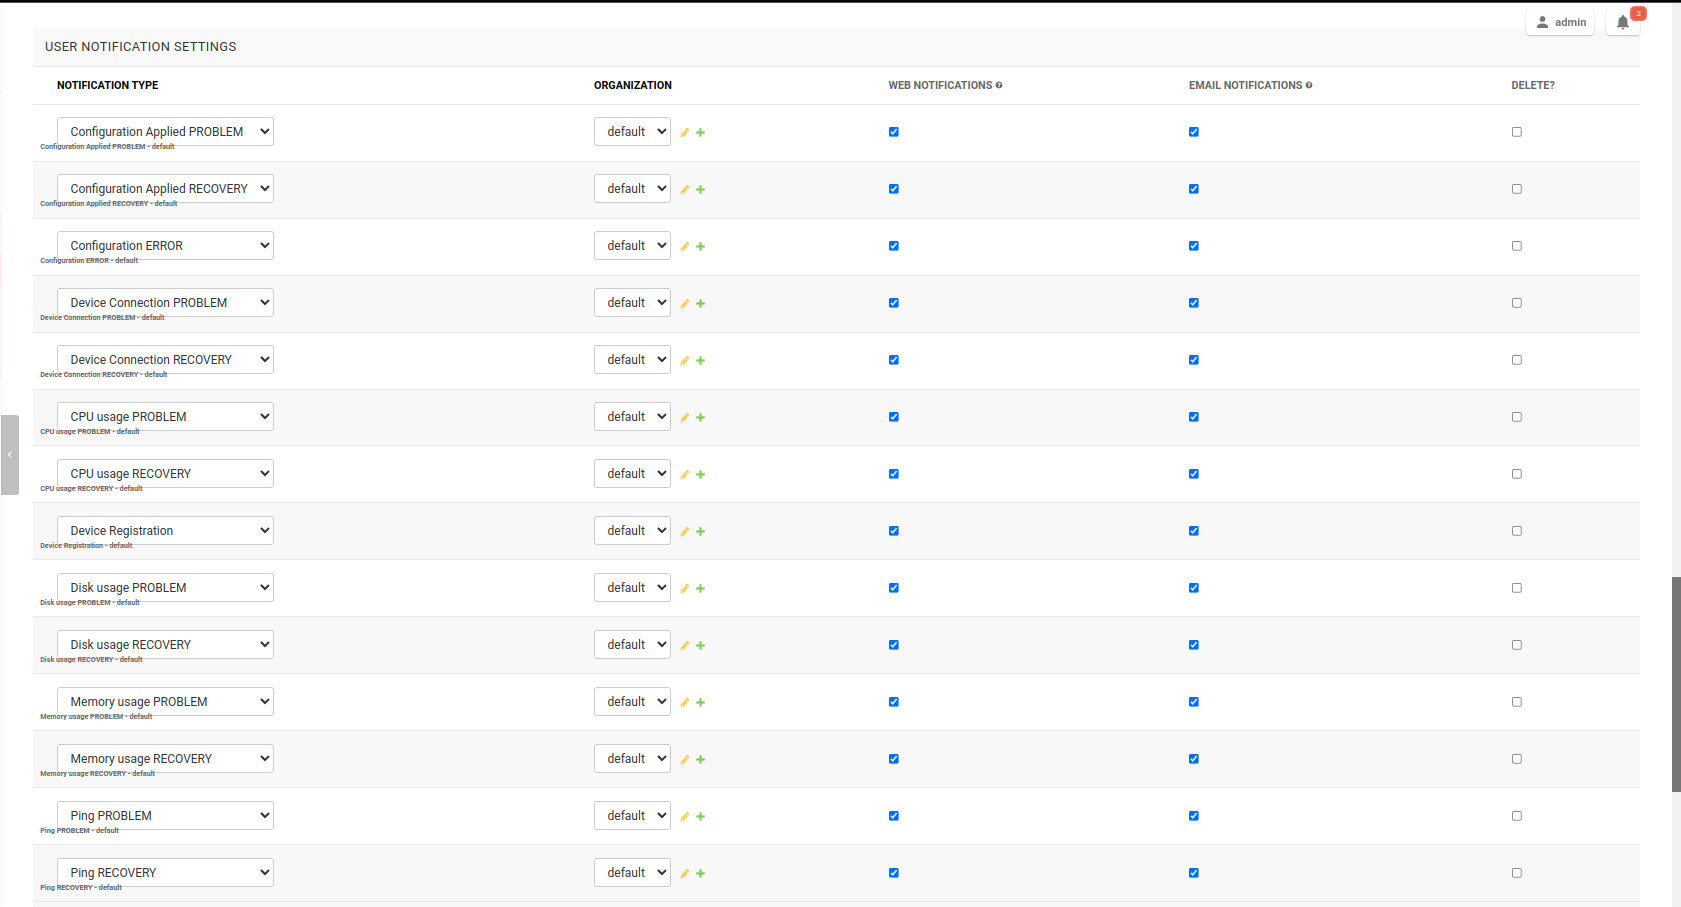
openwisp-notifications allows users to select their preferred way of receiving notifications. Users can choose from web or email notifications. These settings have been categorized over notification type and organization, therefore allowing users to only receive notifications from selected organization or notification type.
Notification settings are automatically created for all notification types and organizations for all users. While superusers can add or delete notification settings for everyone, staff users can only modify their preferred ways for receiving notifications. With provided functionality, users can choose to receive both web and email notifications or only web notifications. Users can also stop receiving notifications by disabling both web and email option for a notification setting.
Note: If a user has not configured their email or web preference for a particular notification setting, then email_notification or web_notification option of concerned notification type will be used respectively.
Deleting Notification Preferences
Deleting the notification preferences is an advanced option. Users should turn off web and email notifications instead of deleting notification preferences. Deleted notification preferences may be re-created automatically if the system needs it.
Silencing notifications for specific objects temporarily or permanently
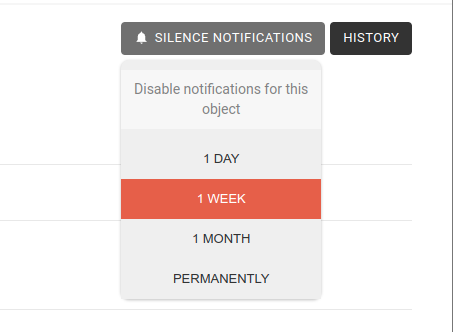
OpenWISP Notifications allows users to silence all notifications generated by specific objects they are not interested in for a desired period of time or even permanently, while other users will keep receiving notifications normally.
Using the widget on an object’s admin change form, a user can disable all notifications generated by that object for a day, week, month or permanently.
Note: This feature requires configuring “OPENWISP_NOTIFICATIONS_IGNORE_ENABLED_ADMIN” to enable the widget in the admin section of the required models.
Scheduled deletion of notifications
OpenWISP Notifications provides a celery task to automatically delete notifications older than a pre-configured number of days. In order to run this task periodically, you will need to configure CELERY_BEAT_SCHEDULE setting as shown in setup instructions.
The celery task takes only one argument, i.e. number of days. You can provide any number of days in args key while configuring CELERY_BEAT_SCHEDULE setting.
E.g., if you want notifications older than 10 days to get deleted automatically, then configure CELERY_BEAT_SCHEDULE as follows:
CELERY_BEAT_SCHEDULE = {
    'delete_old_notifications': {
        'task': 'openwisp_notifications.tasks.delete_old_notifications',
        'schedule': timedelta(days=1),
        'args': (10,), # Here we have defined 10 instead of 90 as shown in setup instructions
    },
}
Please refer to “Periodic Tasks” section of Celery’s documentation to learn more.
Settings
OPENWISP_NOTIFICATIONS_HOST
type |
str |
default |
Any domain defined in ALLOWED_HOST |
This setting defines the domain at which API and Web Socket communicate for working of notification widget.
Note: You don’t need to configure this setting if you don’t host your API endpoints on a different sub-domain.
If your root domain is example.com and API and Web Socket are hosted at api.example.com, then configure setting as follows:
OPENWISP_NOTIFICATIONS_HOST = 'https://api.example.com'This feature requires you to allow CORS on your server. We use django-cors-headers module to easily setup CORS headers. Please refer django-core-headers’ setup documentation.
Configure django-cors-headers settings as follows:
CORS_ALLOW_CREDENTIALS = True
CORS_ORIGIN_WHITELIST = ['https://www.example.com']
Configure Django’s settings as follows:
SESSION_COOKIE_DOMAIN = 'example.com'
CSRF_COOKIE_DOMAIN = 'example.com'
Please refer to Django’s settings documentation for more information on SESSION_COOKIE_DOMAIN and CSRF_COOKIE_DOMAIN settings.
OPENWISP_NOTIFICATIONS_SOUND
type |
str |
default |
This setting defines notification sound to be played when notification is received in real-time on admin site.
Provide an absolute or relative path(hosted on your webserver) to audio file as show below.
OPENWISP_NOTIFICATIONS_SOUND = '/static/your-appname/audio/notification.mp3'OPENWISP_NOTIFICATIONS_CACHE_TIMEOUT
type |
int |
default |
172800 (2 days, in seconds) |
It sets the number of seconds the notification contents should be stored in the cache. If you want cached notification content to never expire, then set it to None. Set it to 0 if you don’t want to store notification contents in cache at all.
OPENWISP_NOTIFICATIONS_IGNORE_ENABLED_ADMIN
type |
list |
default |
[] |
This setting enables the widget which allows users to silence notifications for specific objects temporarily or permanently. in the change page of the specified ModelAdmin classes.
E.g., if you want to enable the widget for objects of openwisp_users.models.User model, then configure the setting as following:
OPENWISP_NOTIFICATIONS_IGNORE_ENABLED_ADMIN = ['openwisp_users.admin.UserAdmin']OPENWISP_NOTIFICATIONS_POPULATE_PREFERENCES_ON_MIGRATE
type |
bool |
default |
True |
This setting allows to disable creating notification preferences on running migrations.
OPENWISP_NOTIFICATIONS_NOTIFICATION_STORM_PREVENTION
When the system starts creating a lot of notifications because of a general network outage (e.g.: a power outage, a global misconfiguration), the notification storm prevention mechanism avoids the constant displaying of new notification alerts as well as their sound, only the notification counter will continue updating periodically, although it won’t emit any sound or create any other visual element until the notification storm is over.
This setting allows tweaking how this mechanism works.
The default configuration is as follows:
OPENWISP_NOTIFICATIONS_NOTIFICATION_STORM_PREVENTION = {
    # Time period for tracking burst of notifications (in seconds)
    'short_term_time_period': 10,
    # Number of notifications considered as a notification burst
    'short_term_notification_count': 6,
    # Time period for tracking notifications in long time interval (in seconds)
    'long_term_time_period': 180,
    # Number of notifications in long time interval to be considered as a notification storm
    'long_term_notification_count': 30,
    # Initial time for which notification updates should be skipped (in seconds)
    'initial_backoff': 1,
    # Time by which skipping of notification updates should be increased (in seconds)
    'backoff_increment': 1,
    # Maximum interval after which the notification widget should get updated (in seconds)
    'max_allowed_backoff': 15,
}
Exceptions
NotificationRenderException
openwisp_notifications.exceptions.NotificationRenderExceptionRaised when notification properties(email or message) cannot be rendered from concerned notification type. It sub-classes Exception class.
It can be raised due to accessing non-existing keys like missing related objects in email or message setting of concerned notification type.
REST API
Live documentation
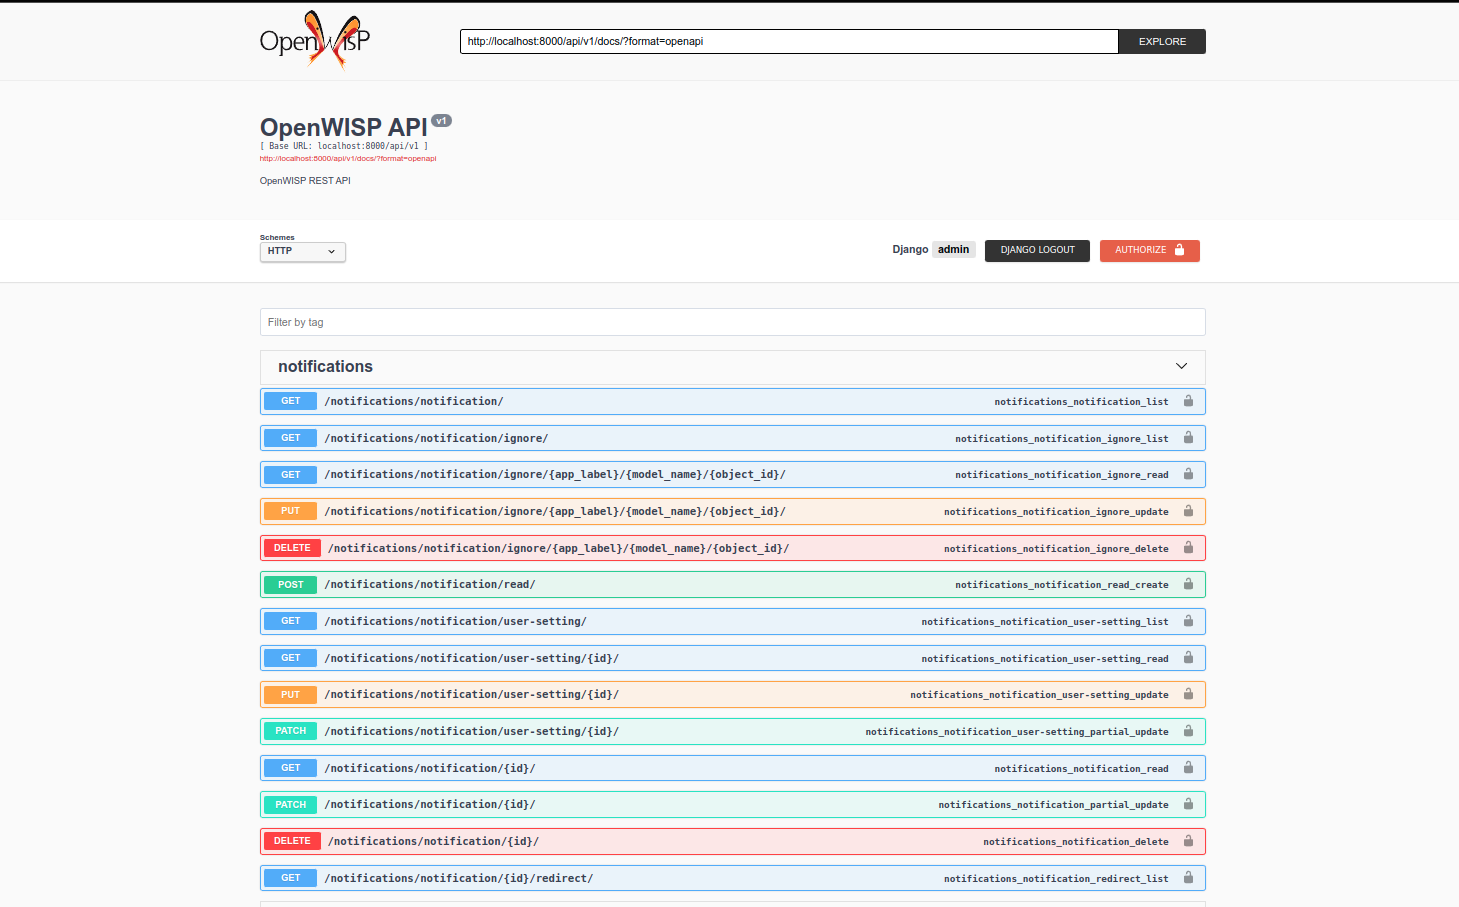
A general live API documentation (following the OpenAPI specification) is available at /api/v1/docs/.
Browsable web interface

Additionally, opening any of the endpoints listed below directly in the browser will show the browsable API interface of Django-REST-Framework, which makes it even easier to find out the details of each endpoint.
Authentication
See openwisp-users: authenticating with the user token.
When browsing the API via the Live documentation or the Browsable web interface, you can use the session authentication by logging in the django admin.
Pagination
The list endpoint support the page_size parameter that allows paginating the results in conjunction with the page parameter.
GET /api/v1/notifications/notification/?page_size=10
GET /api/v1/notifications/notification/?page_size=10&page=2
List of endpoints
Since the detailed explanation is contained in the Live documentation and in the Browsable web page of each endpoint, here we’ll provide just a list of the available endpoints, for further information please open the URL of the endpoint in your browser.
List user’s notifications
GET /api/v1/notifications/notification/Mark all user’s notifications as read
POST /api/v1/notifications/notification/read/Get notification details
GET /api/v1/notifications/notification/{pk}/Mark a notification read
PATCH /api/v1/notifications/notification/{pk}/Delete a notification
DELETE /api/v1/notifications/notification/{pk}/List user’s notification setting
GET /api/v1/notifications/notification/user-setting/Get notification setting details
GET /api/v1/notifications/notification/user-setting/{pk}/Update notification setting details
PATCH /api/v1/notifications/notification/user-setting/{pk}/List user’s object notification setting
GET /api/v1/notifications/notification/ignore/Get object notification setting details
GET /api/v1/notifications/notification/ignore/{app_label}/{model_name}/{object_id}/Create object notification setting
PUT /api/v1/notifications/notification/ignore/{app_label}/{model_name}/{object_id}/Delete object notification setting
DELETE /api/v1/notifications/notification/ignore/{app_label}/{model_name}/{object_id}/Management Commands
populate_notification_preferences
This command will populate notification preferences for all users for organizations they are member of.
Example usage:
# cd tests/
./manage.py populate_notification_preferencesNote: Before running this command make sure that the celery broker is running and reachable by celery workers.
create_notification
This command will create a dummy notification with default notification type for the members of default organization. This command is primarily provided for the sole purpose of testing notification in development only.
Example usage:
# cd tests/
./manage.py create_notification
Installing for development
We use Redis as celery broker (you can use a different broker if you want). The recommended way for development is running it using Docker so you will need to install docker and docker-compose beforehand.
In case you prefer not to use Docker you can install Redis from your repositories, but keep in mind that the version packaged by your distribution may be different.
Install SQLite:
sudo apt install sqlite3 libsqlite3-dev openssl libssl-devFork and clone the forked repository:
git clone git://github.com/<your_fork>/openwisp-notificationsNavigate into the cloned repository:
cd openwisp-notifications/Setup and activate a virtual-environment. (we’ll be using virtualenv)
python -m virtualenv env
source env/bin/activate
Make sure that you are using pip version 20.2.4 before moving to the next step:
pip install -U "pip==20.2.4" wheelInstall development dependencies:
pip install -e .
pip install -r requirements-test.txt
npm install -g jslint stylelint
Start Redis using docker-compose:
docker-compose up -dCreate a database:
cd tests/
./manage.py migrate
./manage.py createsuperuser
Launch the development server:
./manage.py runserverYou can access the admin interface at http://127.0.0.1:8000/admin/.
Run celery worker (separate terminal window is needed):
# (cd tests)
celery -A openwisp2 worker -l info
Run tests with:
# run qa checks
./run-qa-checks

# standard tests
./runtests.py

# tests for the sample app
SAMPLE_APP=1 ./runtests.py
When running the last line of the previous example, the environment variable SAMPLE_APP activates the sample app in /tests/openwisp2/ which is a simple django app that extend openwisp-notifications with the sole purpose of testing its extensibility, for more information regarding this concept, read the following section.
Extending openwisp-notifications
One of the core values of the OpenWISP project is Software Reusability, for this reason openwisp-notification provides a set of base classes which can be imported, extended and reused to create derivative apps.
In order to implement your custom version of openwisp-notifications, you need to perform the steps described in the rest of this section.
When in doubt, the code in test project and sample_notifications will guide you in the correct direction: just replicate and adapt that code to get a basic derivative of openwisp-notifications working.
Premise: if you plan on using a customized version of this module, we suggest to start with it since the beginning, because migrating your data from the default module to your extended version may be time consuming.
1. Initialize your custom module
The first thing you need to do in order to extend openwisp-notifications is create a new django app which will contain your custom version of that openwisp-notifications app.
A django app is nothing more than a python package (a directory of python scripts), in the following examples we’ll call this django app as mynotifications but you can name it how you want:
django-admin startapp mynotificationsKeep in mind that the command mentioned above must be called from a directory which is available in your PYTHON_PATH so that you can then import the result into your project.
Now you need to add mynotifications to INSTALLED_APPS in your settings.py, ensuring also that openwisp_notifications has been removed:
INSTALLED_APPS = [
    # ... other apps ...
    # 'openwisp_notifications',        <-- comment out or delete this line
    'mynotifications',
]
For more information about how to work with django projects and django apps, please refer to the django documentation.
2. Install openwisp-notifications
Install (and add to the requirement of your project) openwisp-notifications:
pip install -U https://github.com/openwisp/openwisp-notifications/tarball/master3. Add EXTENDED_APPS
Add the following to your settings.py:
EXTENDED_APPS = ['openwisp_notifications']4. Add openwisp_utils.staticfiles.DependencyFinder
Add openwisp_utils.staticfiles.DependencyFinder to STATICFILES_FINDERS in your settings.py:
STATICFILES_FINDERS = [
    'django.contrib.staticfiles.finders.FileSystemFinder',
    'django.contrib.staticfiles.finders.AppDirectoriesFinder',
    'openwisp_utils.staticfiles.DependencyFinder',
]
5. Add openwisp_utils.loaders.DependencyLoader
Add openwisp_utils.loaders.DependencyLoader to TEMPLATES in your settings.py:
TEMPLATES = [
    {
        'BACKEND': 'django.template.backends.django.DjangoTemplates',
        'OPTIONS': {
            'loaders': [
                'django.template.loaders.filesystem.Loader',
                'django.template.loaders.app_directories.Loader',
                'openwisp_utils.loaders.DependencyLoader',
            ],
            'context_processors': [
                'django.template.context_processors.debug',
                'django.template.context_processors.request',
                'django.contrib.auth.context_processors.auth',
                'django.contrib.messages.context_processors.messages',
            ],
        },
    }
]
6. Inherit the AppConfig class
Please refer to the following files in the sample app of the test project:
For more information regarding the concept of AppConfig please refer to the “Applications” section in the django documentation.
7. Create your custom models
For the purpose of showing an example, we added a simple “details” field to the models of the sample app in the test project.
You can add fields in a similar way in your models.py file.
Note: For doubts regarding how to use, extend or develop models please refer to the “Models” section in the django documentation.
8. Add swapper configurations
Add the following to your settings.py:
# Setting models for swapper module
OPENWISP_NOTIFICATIONS_NOTIFICATION_MODEL = 'mynotifications.Notification'
OPENWISP_NOTIFICATIONS_NOTIFICATIONSETTING_MODEL = 'mynotifications.NotificationSetting'
OPENWISP_NOTIFICATIONS_IGNOREOBJECTNOTIFICATION_MODEL = 'mynotifications.IgnoreObjectNotification'
9. Create database migrations
Create and apply database migrations:
./manage.py makemigrations
./manage.py migrate
For more information, refer to the “Migrations” section in the django documentation.
10. Create your custom admin
Refer to the admin.py file of the sample app.
To introduce changes to the admin, you can do it in two main ways which are described below.
Note: For more information regarding how the django admin works, or how it can be customized, please refer to “The django admin site” section in the django documentation.
1. Monkey patching
If the changes you need to add are relatively small, you can resort to monkey patching.
For example:
from openwisp_notifications.admin import NotificationSettingInline

NotificationSettingInline.list_display.insert(1, 'my_custom_field')
NotificationSettingInline.ordering = ['-my_custom_field']
2. Inheriting admin classes
If you need to introduce significant changes and/or you don’t want to resort to monkey patching, you can proceed as follows:
from django.contrib import admin
from openwisp_notifications.admin import (
    NotificationSettingInline as BaseNotificationSettingInline,
)
from openwisp_notifications.swapper import load_model

NotificationSetting = load_model('NotificationSetting')

admin.site.unregister(NotificationSettingAdmin)
admin.site.unregister(NotificationSettingInline)


@admin.register(NotificationSetting)
class NotificationSettingInline(BaseNotificationSettingInline):
    # add your changes here
    pass
11. Create root URL configuration
Please refer to the urls.py file in the test project.
For more information about URL configuration in django, please refer to the “URL dispatcher” section in the django documentation.
12. Create root routing configuration
Please refer to the routing.py file in the test project.
For more information about URL configuration in django, please refer to the “Routing” section in the Channels documentation.
13. Create celery.py
Please refer to the celery.py file in the test project.
For more information about the usage of celery in django, please refer to the “First steps with Django” section in the celery documentation.
14. Import Celery Tasks
Add the following in your settings.py to import celery tasks from openwisp_notifications app.
CELERY_IMPORTS = ('openwisp_notifications.tasks',)16. Register Notification Types
You can register notification types as shown in the section for registering notification types.
A reference for registering a notification type is also provided in sample_notifications/apps.py. The registered notification type of sample_notifications app is used for creating notifications when an object of TestApp model is created. You can use sample_notifications/models.py as reference for your implementation.
17. Import the automated tests
When developing a custom application based on this module, it’s a good idea to import and run the base tests too, so that you can be sure the changes you’re introducing are not breaking some of the existing feature of openwisp-notifications.
In case you need to add breaking changes, you can overwrite the tests defined in the base classes to test your own behavior.
See the tests of the sample_notifications to find out how to do this.
Note: Some tests will fail if templatetags and admin/base.html are not configured properly. See preceeding sections to configure them properly.
Other base classes that can be inherited and extended
The following steps are not required and are intended for more advanced customization.
API views
The API view classes can be extended into other django applications as well. Note that it is not required for extending openwisp-notifications to your app and this change is required only if you plan to make changes to the API views.
Create a view file as done in sample_notifications/views.py
For more information regarding Django REST Framework API views, please refer to the “Generic views” section in the Django REST Framework documentation.
Web Socket Consumers
The Web Socket Consumer classes can be extended into other django applications as well. Note that it is not required for extending openwisp-notifications to your app and this change is required only if you plan to make changes to the consumers.
Create a consumer file as done in sample_notifications/consumers.py
For more information regarding Channels’ Consumers, please refer to the “Consumers” section in the Channels documentation.
Contributing
Please read the OpenWISP contributing guidelines.
License
See LICENSE.
Support
Attributions
Icons
Icons used are taken from Font Awesome project.
LICENSE: https://fontawesome.com/license
Sound
Notification sound is taken from Notification Sounds.
LICENSE: Creative Commons Attribution license
Project details
Download files
Download the file for your platform. If you're not sure which to choose, learn more about installing packages.
Source Distribution
Built Distribution
File details
Details for the file openwisp-notifications-1.0.tar.gz.
File metadata
- Download URL: openwisp-notifications-1.0.tar.gz
- Upload date:
- Size: 165.4 kB
- Tags: Source
- Uploaded using Trusted Publishing? No
- Uploaded via: twine/3.2.0 pkginfo/1.5.0.1 requests/2.27.1 setuptools/59.6.0 requests-toolbelt/0.9.1 tqdm/4.48.2 CPython/3.8.10
File hashes
| Algorithm | Hash digest | |
|---|---|---|
| SHA256 | fdf4026dcf61c87ecc2bb35a065dffcfea060f8def486715f0e4169559cdded1 |
|
| MD5 | 6a9f23fe834b144e3d097a5b99739b62 |
|
| BLAKE2b-256 | b0a9492712d26ba921378627968062ec2e75923c80910f7378f7a7356c2ef86d |
File details
Details for the file openwisp_notifications-1.0-py2.py3-none-any.whl.
File metadata
- Download URL: openwisp_notifications-1.0-py2.py3-none-any.whl
- Upload date:
- Size: 157.2 kB
- Tags: Python 2, Python 3
- Uploaded using Trusted Publishing? No
- Uploaded via: twine/3.2.0 pkginfo/1.5.0.1 requests/2.27.1 setuptools/59.6.0 requests-toolbelt/0.9.1 tqdm/4.48.2 CPython/3.8.10
File hashes
| Algorithm | Hash digest | |
|---|---|---|
| SHA256 | 45370fffa4562f333ad7e416b37aea9d4a3e0b29b08d364b1e46fc2941a409fa |
|
| MD5 | 1c76189696df8a7bba26ddfb0ae2b157 |
|
| BLAKE2b-256 | 759df0b8360ac32f21e556a105362cb677893d24ea859bfeb57bd2aee84e880e |


